Showing posts with label Home DIY. Show all posts

Saturday, May 25, 2013

Patio Makeover Part II

After creating my flower pots, one may have realized that the colors on the pots and chairs are very, well let's just say, wrong together. 


So, I first went for a hunt for outdoor cushions at different stores, but found that cushions were not the right size, color, or were just plain too expensive!  In comes my DIY alter ego shouting, "Just cover your cushions!"  Of course, I headed off to Joann's, found the outdoor fabric and now I was surrounded by fun, colorful fabrics to use.

This is how it all came together:

Super fun and easy!  All I did was sew yellow slip covers and blue pocket pillow cases to cover my small accent pillows.


Since I am new to the sewing world, I have not included my personal DIY pocket pillow covers; however, here is the link to site I used to help me:

Pocket Pillow Case Cover: The Frugal Homemaker

Monday, May 6, 2013

Patio Makeover Part 1

This is our quaint patio.  It is nothing overly special at the moment, so it is time for some DIY projects to make it look like new!  Over the next couple weeks this space will be transformed!
 One important piece that every patio needs is some plants.  I looked everywhere for great planters that added color and height, but either the planters were too expensive or too (for the lack of a better word) 'funky'.  Then came my DIY planter project, and I made these wonderful planters in a few hours:
Buy two large and four medium plastic planters.  I got these at Home Depot for less than $20.
Take the two large and two of the four medium and spray paint those babies (I had two small pots for another project). Don't worry about the top section of the pots, we will be painting those later.
Grab your paint brush and paint the tops of the pots.  Use the natural line of the pots to guide you.  Also, paint the inside top part.
Now stack the pots by placing one unpainted medium pot upside down inside the large pot and then setting the other medium pot on top of it.  I put some glue around the edge of the upside down pot to keep it level.  Add dirt, flowers, and decorative rock or bark. (I used a hosta on top and marigolds and snapdragons on bottom.)

Monday, February 25, 2013

Easter is Everywhere!

Easter has taken over!  Eggs, chicks, and bible verses make a beautiful atmosphere.  Here is a look into my Easter world:
This chick I found in a pack of two for $1.00 at Target!  His pal is sitting on the other side of the nest.  How could I resist these cute little guys and at such a bargain (look in the dollar section to find your own).
There is that other little yellow guy.  He is protecting his egg in that lantern. Oh, that silly chick!

I switched out candles for eggs nesting in this antique bottle holder.  I put this beautiful bible verse in a modern chevron background to create a modern chic look.

Sunday, February 24, 2013

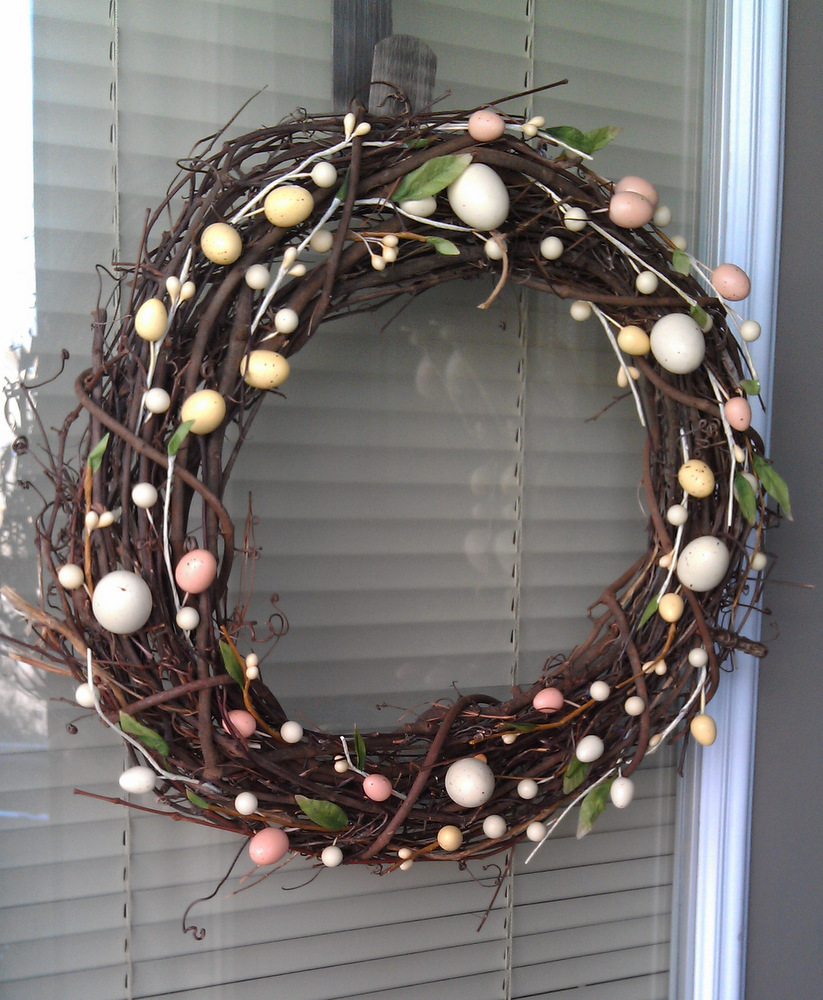
Easter Wreath

Add some Easter cheer to your entrance with a simple wreath.
What You Will Need:
Grapevine Wreath
Hot Glue
Egg Garland
I took the garland and cut the individual pieces apart.  This made it easier to arrange evenly on the wreath.
First arrange the egg garland around the wreath to make sure it is evenly distributed.  Then glue them down.  Easy as that!

Wednesday, January 30, 2013

Paint Chip Valentine Decor

I have seen hundreds of crafts, games, and educational tools being made from paint chip samples.  Being Ms. DIY, I had to try my own craft with these fun & free paint chips; however, there should be a warning label with all these crafts:
Walking to the paint section in Home Depot, I felt confident and ready to claim this free, golden commodity. This confidence faded quickly when I an employee asked if I needed help finding a color.  My answer, "No thank you, I am just going to take all your pink and red samples, so you have to refill each one after I am gone" (Okay, that is not exactly what I said).
Here is my paint chip DIY:
Print off Valentine patterns (I love Valentine birds like the one above) on the paint chips, but remember to place the chips face up in the printer so it prints on the back.  
 Cut out the pattern and add to picture frames.
Then find a place to display your simply beautiful Valentine fun!

Monday, January 28, 2013

Valentine XOX

This weekend I got the Valentine bug!  I decorated the house from top to bottom, so this week will be my Valentine week.  

When I think of Valentine's Day, I always reminisce.  In elementary school, I made a big heart candy box that I treasured, and wrote out my Valentines carefully, so the best love one would go to my crush.  In middle school, friends bought suckers from the student council to be given secretly to their Valentine.  Then in high school, they would write the girls' names on a big chalk board who received flowers and gifts.  

Valentine's Day is always a warm day in the middle of a Wisconsin winter.  Here is one of my fun projects:
All you need is a 10" wreath and two wooden X's ($3 from Micheal's).
I sponge painted the wreath white.
Then I covered the wreath with berries.  These particular berries were from a Christmas berry string, so I just cut off the green ones.
Find a place to set or hang for a lovely Valentine design.

Saturday, January 5, 2013

DIY Ironing Board

This year for Christmas, I received a new sewing machine, so I have been busy gathering tools and materials to get started sewing.  One of the items on my list was an ironing board.  I went to several stores and attempted to find a board that was not too big or clumsy or expensive.  After searching for a bit, I realized that I had the ability to make my perfect ironing board.  I went to Home Depot and Joann's to gather the materials, and it end up costing only $12 ($3- Plywood; $3- Fabric; $4- Batting; $2- Skid Proof Matting). Here is my end product...
DIY Ironing Board Instructions
Plywood 2x2 (you can use any size that works for you)
Cotton Batting
Fabric
Skid Proof Matting
Staples
Scissors
Cut batting to fit the piece of plywood with about 4 inches hanging on each side.  I also doubled the batting to create a better cushion.
I cut the corners, so when stapled, it is not bulky.
Pull all the ends tight, so there were no wrinkles, and staple.
Next, I added the fabric on the top of the batting (before placing fabric, iron or steam it, so there are no wrinkles).  I folded the top and bottom pieces like a present and stapled.
Finally, I stapled skid proof matting to the back to help the ironing board stay still while I am using it.

Saturday, December 29, 2012

Holiday Cheer

Christmas has come and gone, and I am completely grateful for all the wonderful gifts that I received this year; however, my favorite part of the holiday is the giving.  This year I really wanted to give things that would be appreciated in many ways.  The gift that I was super excited about giving this year was my sister's wedding wreaths.  She will be having a rustic wedding at a beautiful barn in Barnesville, MN, so I wanted to give her a present for the wedding day and to decorate her home after.  Here is the wreaths that I created for her:
I used felt and burlap to create rosettes, leaves, and other small details. 
Also, I added medium sized pearls for a classic wedding touch.

Thursday, December 20, 2012

Gift Wrapping

This year I decided to wrap my gifts with a rustic flair.  Brown paper, string, and pine cones create a beautiful present for any person on your list.
Start by wrapping your gifts in brown paper.  I found this paper at Target in the year round gift wrapping section (not the holiday section).
Then I used string to combine the two presents.
Hot glue on a few pine cones and a pine sprig.
Finally, I printed off a small B&W picture of the recipient (in this case recipient's') and attached it with a cute little clothes pin.

Perfect Christmas presents to be proud to give!